It’s been a few years since I first had to register for the PE exam. Luckily, even though I’ve already passed, I was able to go into my NCEES account and see what it’s like to go through the steps so I can give you a walkthrough of what to expect when you do it yourself.
Here’s how to register for the PE Exam:
- Sign in to your NCEES account or create one if you haven’t yet. Don’t use a work email.
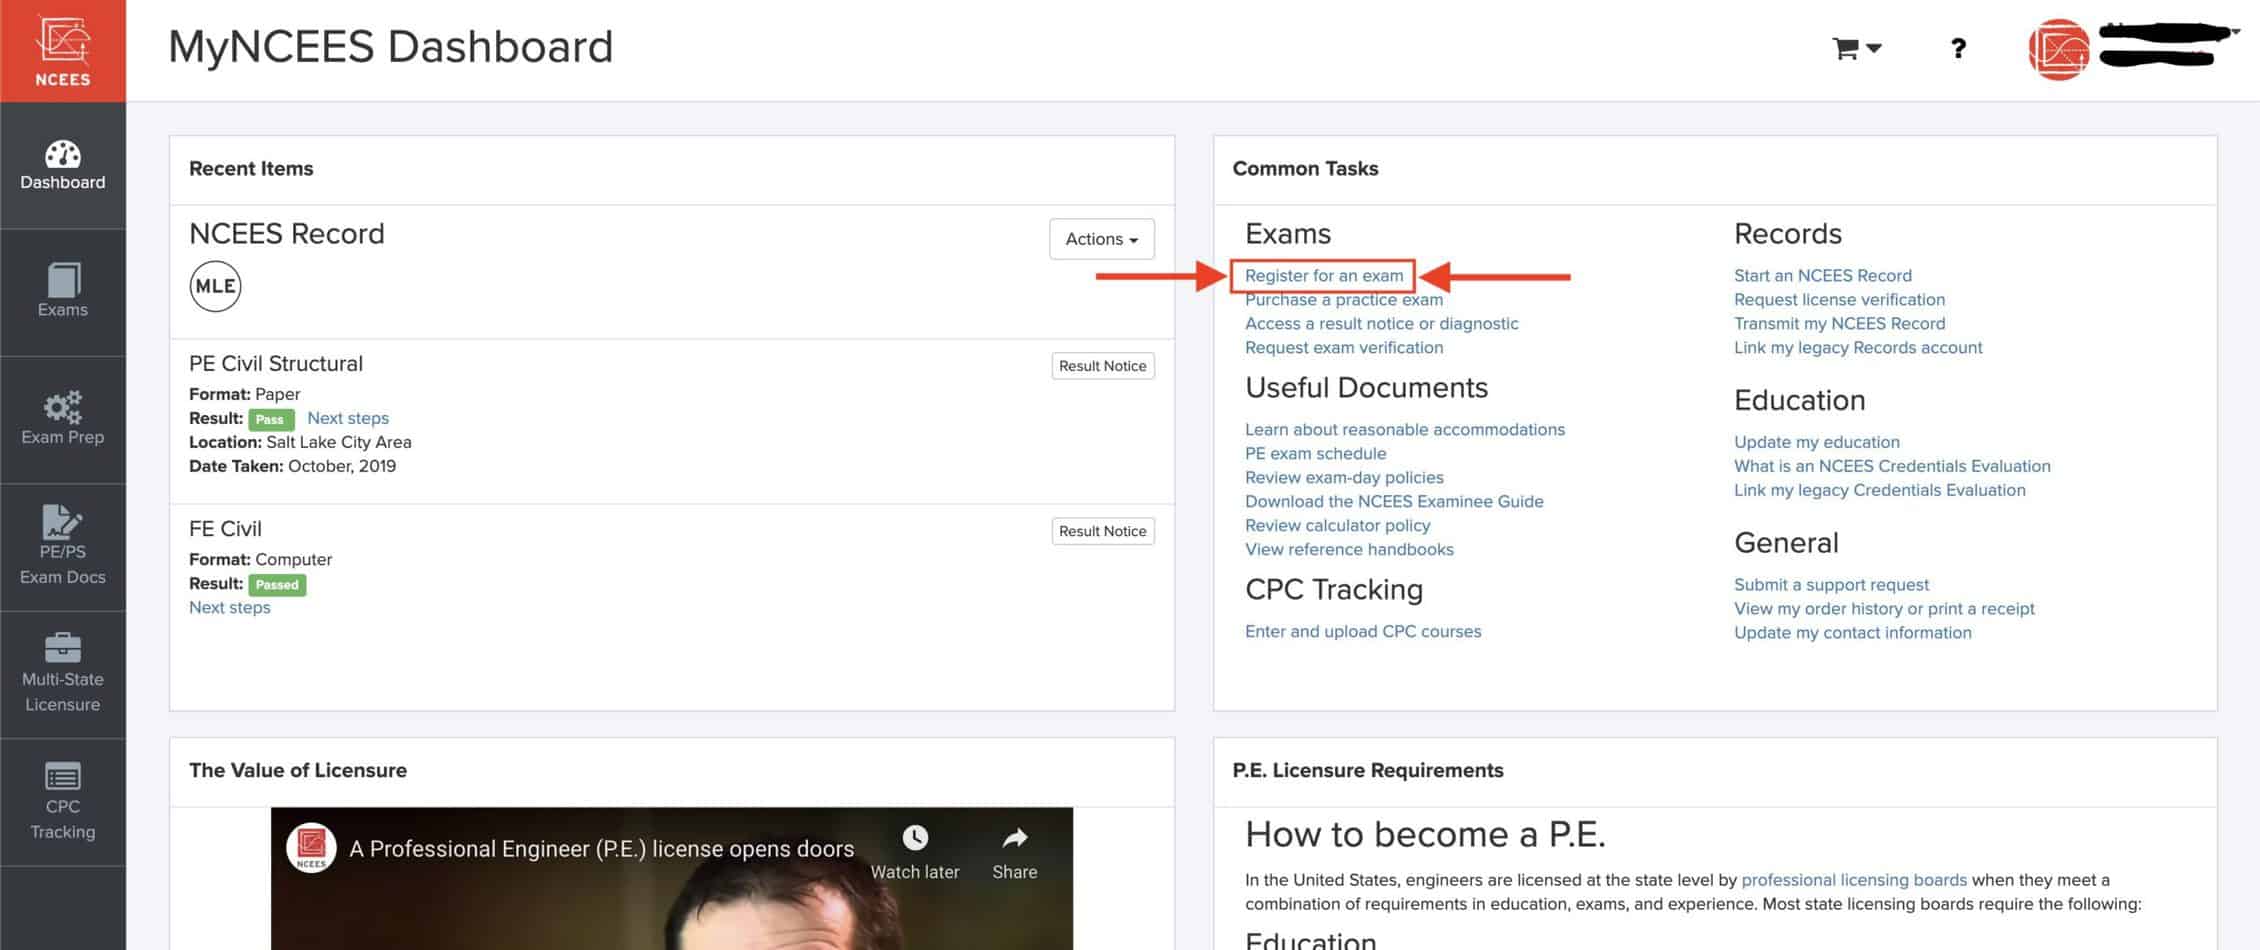
- Click on “Register for an exam” on the right side under “Common Tasks”
- Select the test you want
- Choose your state then read and acknowledge your state’s requirements
- Agree to the NCEES attestation, which includes rules and policies
- Select if you need accommodations
- Purchase a practice exam if you want to
- Review your information
- Enter billing information, agree to fee and other policies, then submit payment
These are just the basic steps though. There are a few important details you need to know about as you go through the process. I’ve done this twice (I failed the PE on my first attempt) and have had to ask NCEES a lot of questions, so let me walk you through what I’ve learned!
Step 0 (optional): Check Your State’s Requirements
The page that NCEES has that’s called “NCEES engineering exam registration” only gives details on the exam and how to find your state’s requirements. But you’ll look at these anyway as part of the process of registering. That’s why this step is optional.
Click here to check out the page for yourself. Once you select your state and the test you want, the “register” button appears and takes you to a page where you can then follow steps 1-9 that I’ll outline now. You can also do these steps without ever seeing the “NCEES engineering exam registration” page if you want.
Step 1: Create or Sign Into Your NCEES Account
If you have an NCESS account, you’ll need to sign in before you can go any further.
If you don’t have an NCEES account yet, click here to create one. Just make sure not to use a work email, you’re going to keep this account for your entire career and you don’t want it attached to an email address that you might not always have.
Step 2: Click on “Register for an exam”
You can see this option on the right side under “Common Tasks” once you’re signed into your NCEES account.
Step 3: Select Your Exam
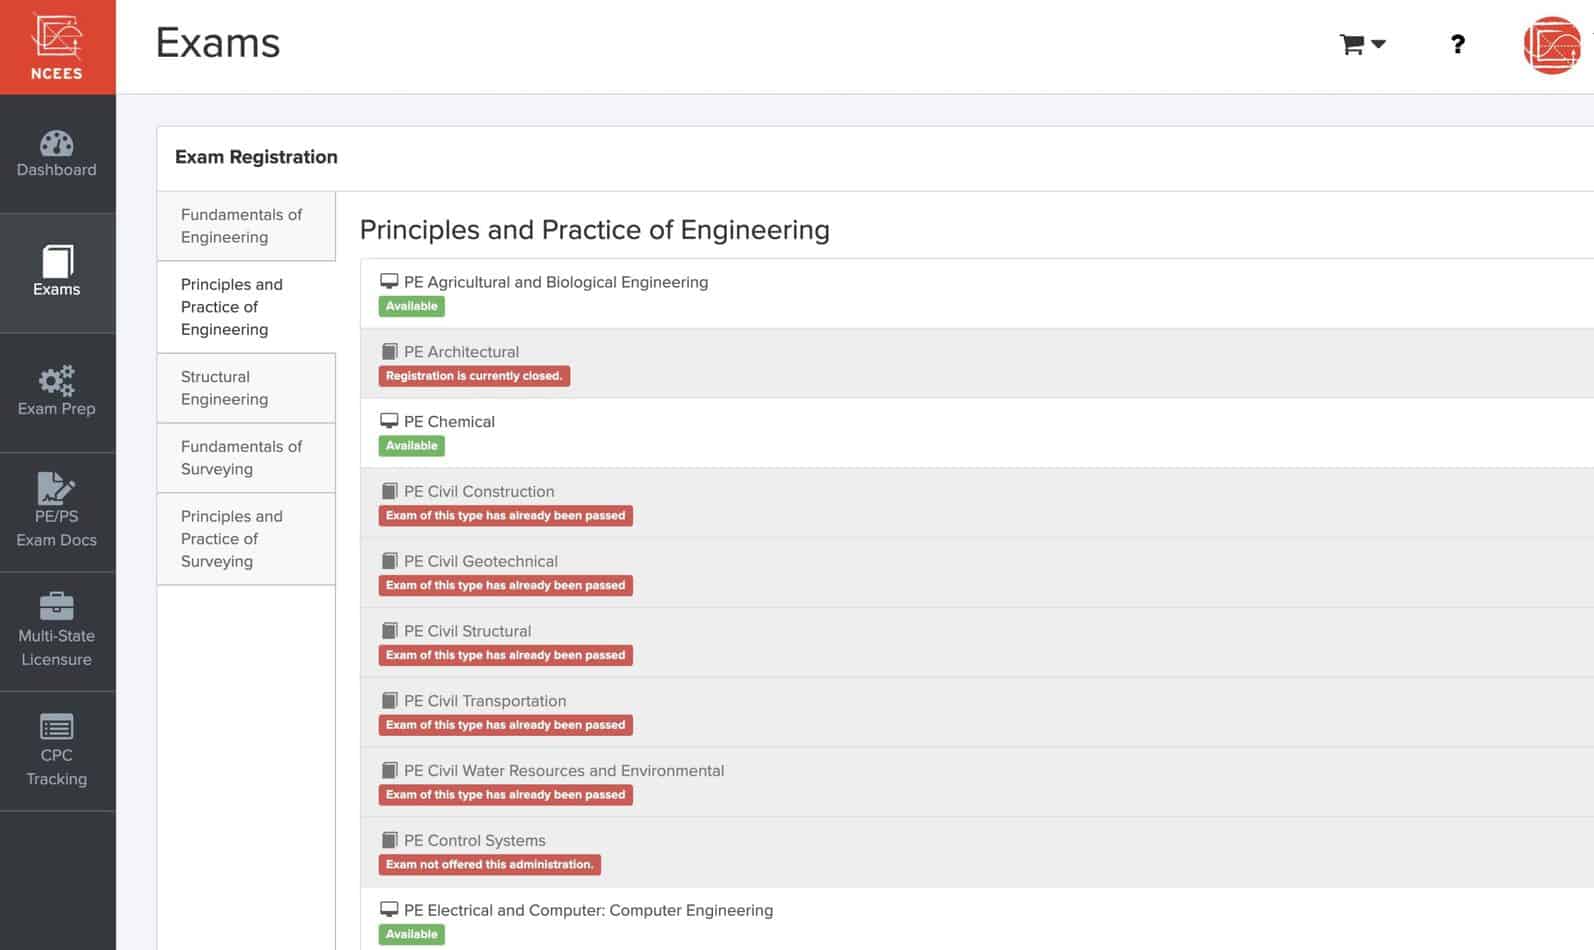
The far left panel, which contains your Dashboard, Exams, Exam Prep, etc. stays consistent throughout the process. The left panel within the “Exam Registration” area is where you’ll select the type of test you’re taking. Here are the options and a little information about each:
- Fundamentals of Engineering (FE) – If you’re wanting to become an Engineer in Training this is for you. In most cases, you must pass this before becoming a licensed PE.
- Principles and Practice of Engineering (PE) exam – this is most likely the one you want.
- Structural Engineering (SE) – this test is only for engineers who already have their PE license and want to get the additional SE license on top of it.
- Fundamentals of Surveying and Principles and Practice of Surveying are last.
Within each option you’ll have the various disciplines you can take. You’ll notice that some exams aren’t available because the registration period isn’t open. Pay attention to the registration dates for your exam so you know when to register!
You’ll also see that I can’t register for the PE exam again because I’ve already passed it. Soon yours will look like this too!
For the purposes of this tutorial, I selected the PE Chemical so I can show you what the rest of the process looks like.
I probably won’t actually take it, chemical sounds hard! Plus I did really bad in my chemistry class in college.
Step 4: Select Your State Board & Acknowledge Its Requirements
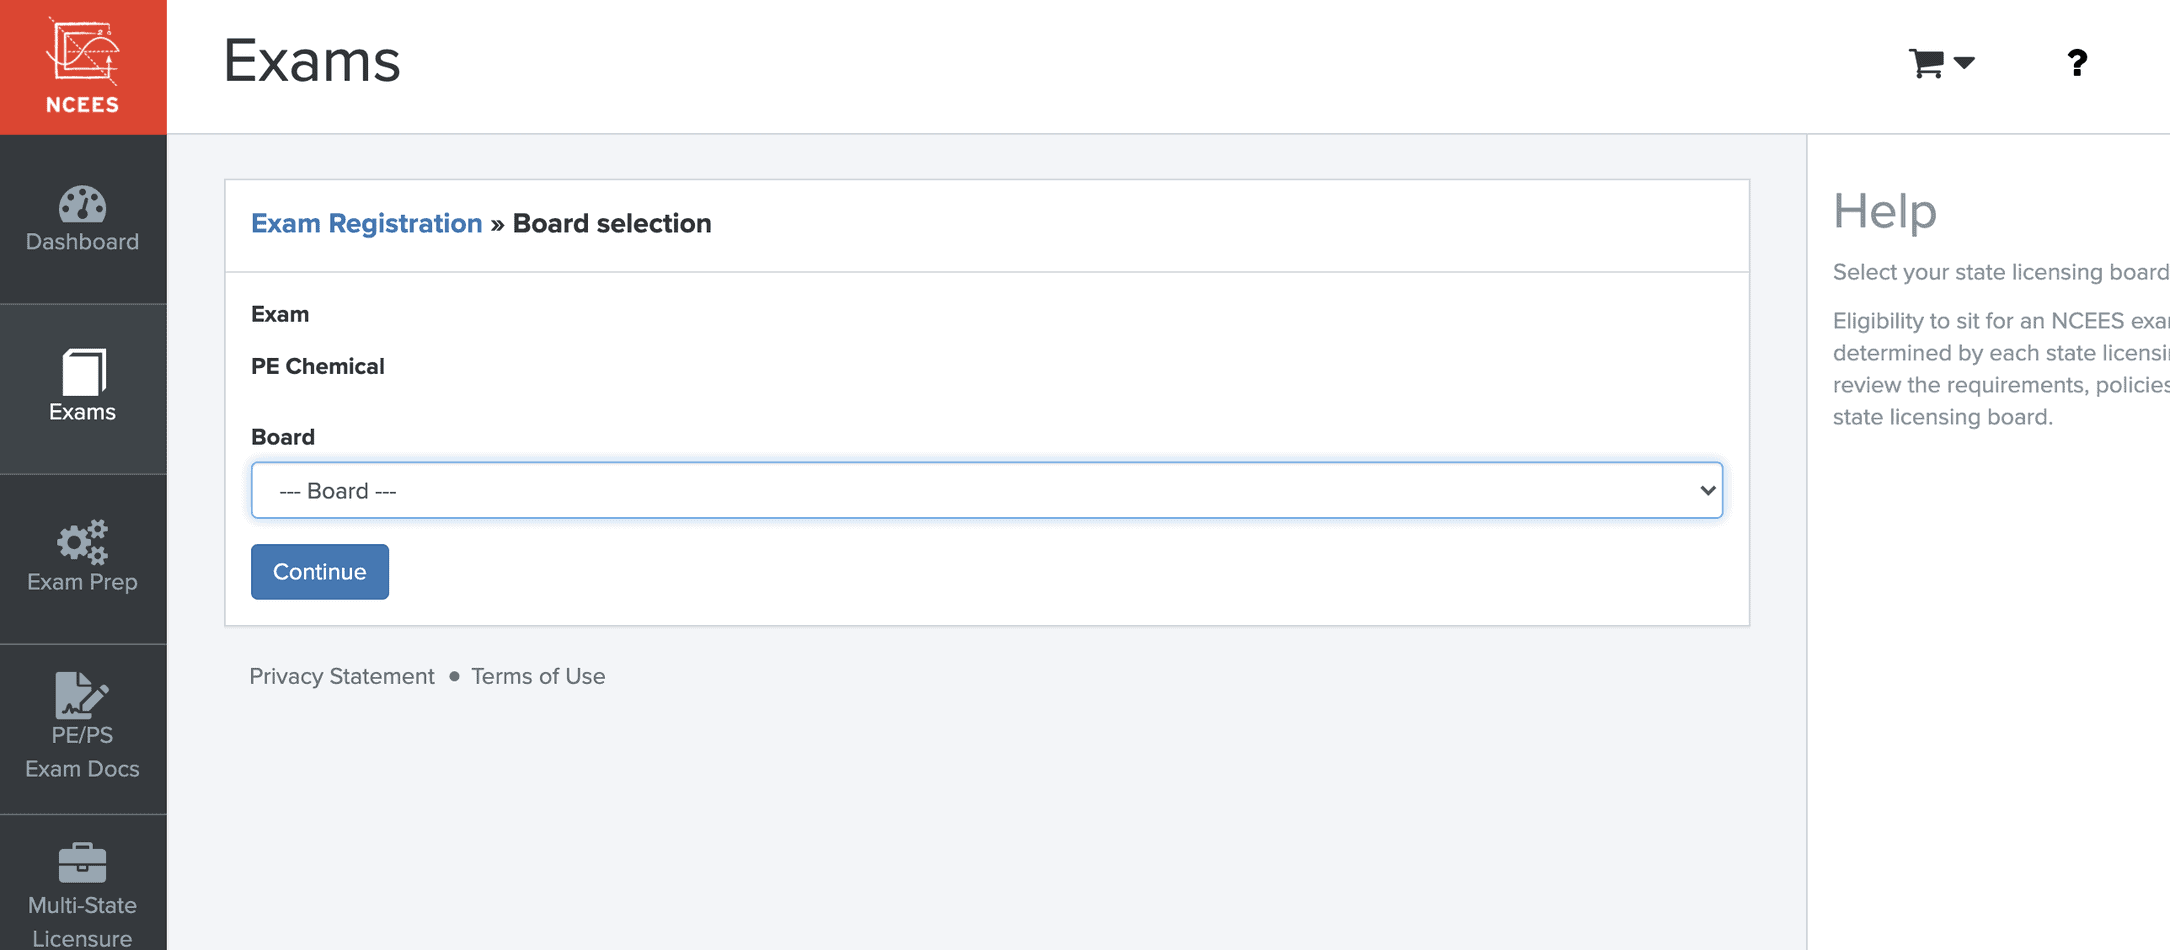
Once you select your board, you’ll see this page:
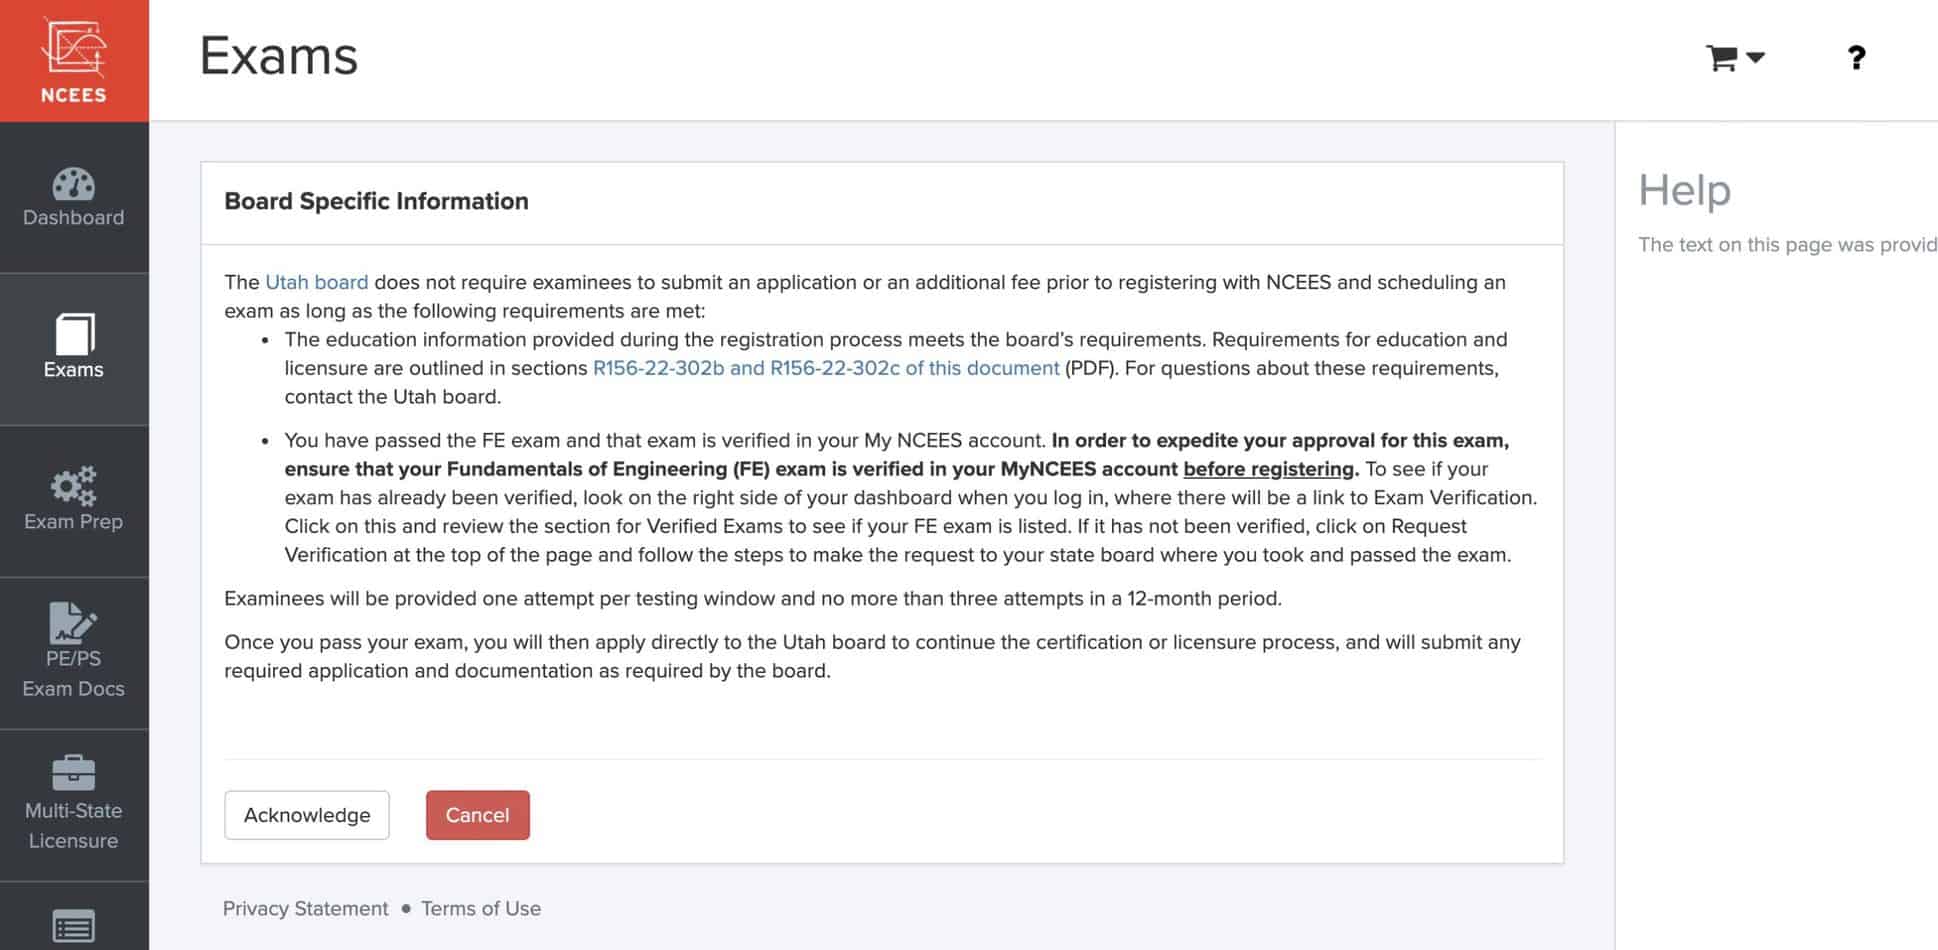
If you’re lucky, like me, your board won’t have any additional requirements. Some states, like Texas, have special rules about when you can take the PE and what you have to do before you can:

It just depends on the state though and you’ll see your states requirements when you select your board. Just make sure to actually read through it though! This isn’t one of those super long terms & conditions that you can get away with saying you read when you actually didn’t. It will affect your eligibility to get licensed!
Step 5: Agree to the Attestation

This section is also one of those that you can’t really skip through without reading. Here’s what each piece of it is about:
- Make sure your name is correct. I go by my middle name so I had to be careful it had my legal name on there.
- Agree to electronic transactions, which is pretty straightforward.
- Agree that you are telling the truth on everything.
- Confirm that you’ve read the NCEES Examinee Guide, which is linked to in that line. This is also important, you will definitely want to open that and read it to understand the rules of test day!
- Agree to the policies in the NCEES Examinee Guide and your state board’s requirements.
- Agree to dispute-resolution policies in the NCEES Examinee Guide. This just means if you have a problem with a decision NCEES made, you’ll have to handle it in the way that they outline in the guide.
- Accept that passing the test doesn’t make you a licensed Professional Engineer and that you have to apply with your state to receive your license. So, on the day you get your results, you’ll see that beautiful green “Pass” icon next to the test, but that does not mean you are licensed. You have to fill out an application with your state.
I can’t overstate how important it is that you actually read through the NCEES Examinee Guide. It will let you know some of what to expect on test day and what you can and can’t do. If you don’t follow the rules in it, you might not be able to take the test.
For example, when I took the PE the second time, there was a guy near where I was sitting who, between the morning and afternoon sections, found out that his ID was expired. NCEES wouldn’t let him take the second half of the test and he had to leave. I’ll never forget the look on his face. I wish I could have bought him an ice cream or something. I really hope he’s passed the test by now!
I’m also not sure that that happened because he didn’t read the guide, though. Honestly, he probably knew the rules, he just didn’t look carefully at his ID. It just iterates the importance of paying attention to all the little details!
Step 6: Declare Whether You Need Accommodations
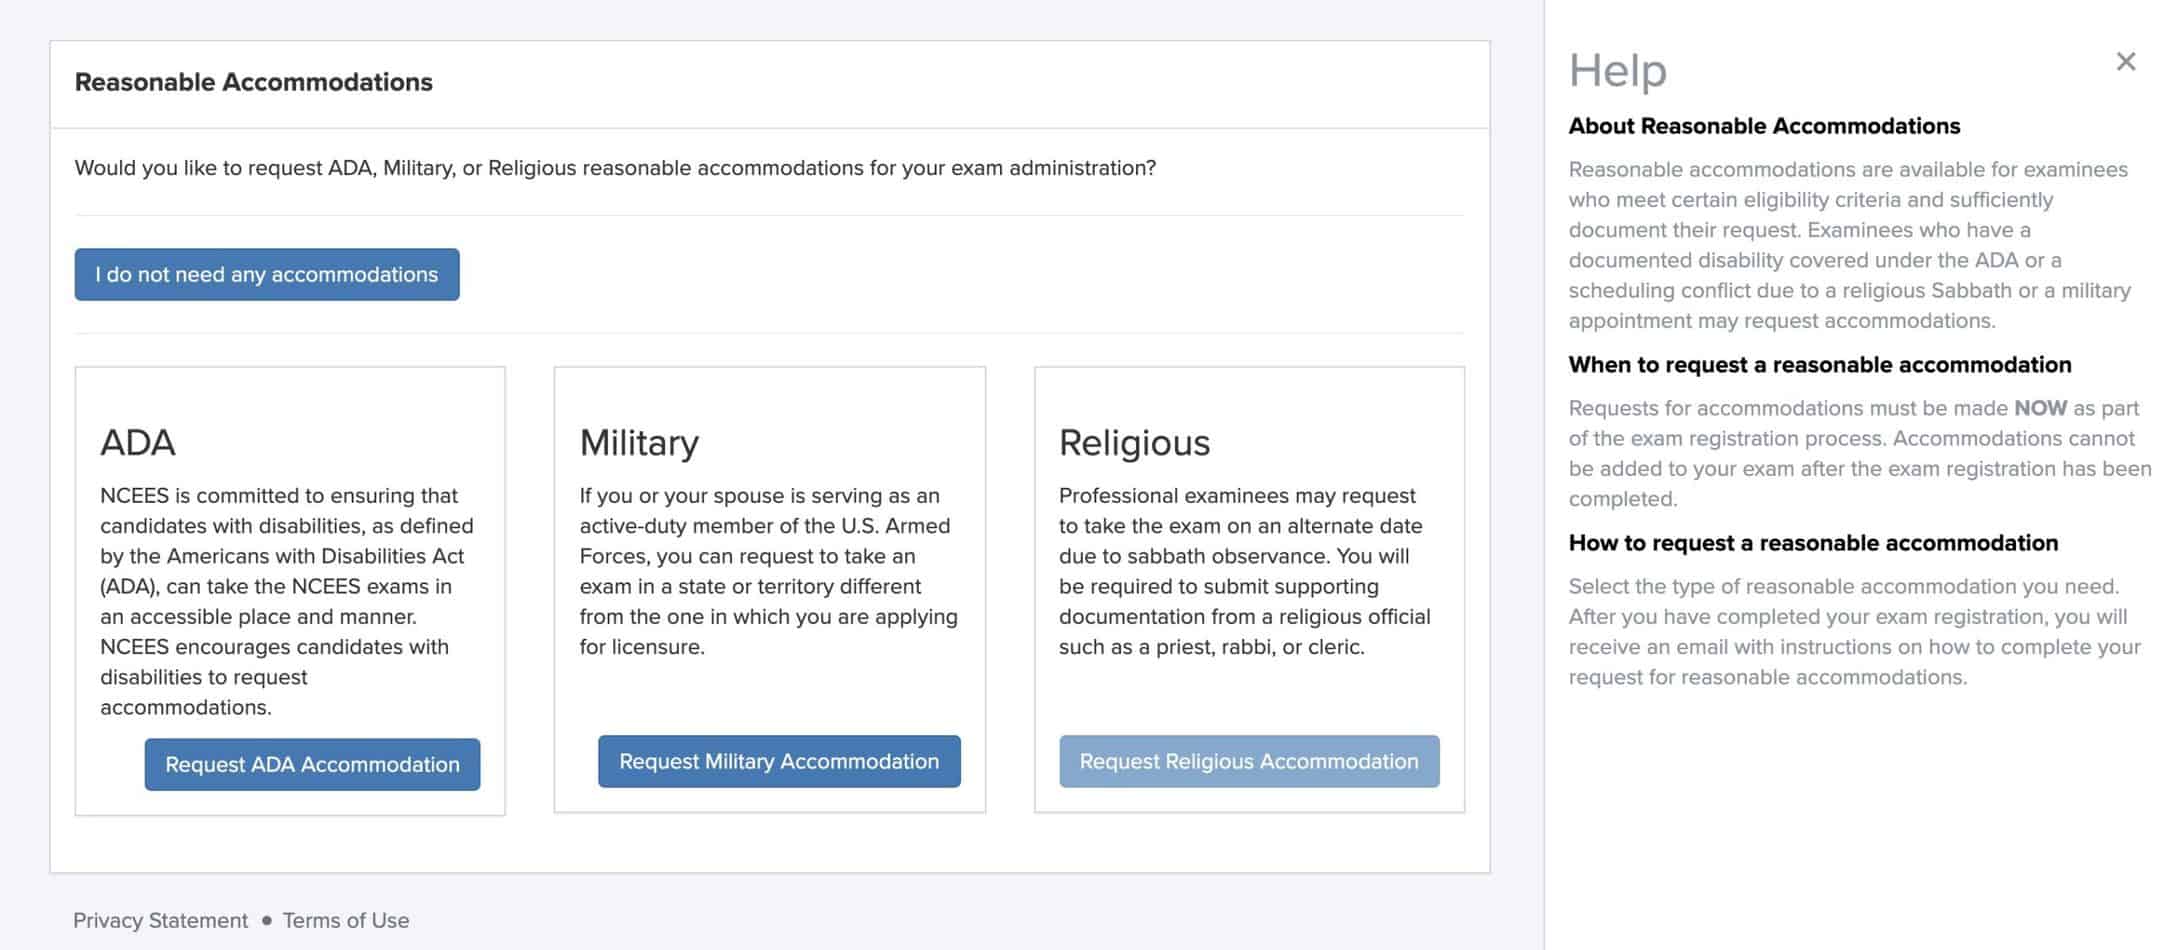
For most people, you can just click that blue “I do not need any accommodations” button right at the top and move on.
If you have any disabilities, though, you can request accommodations according to the Americans with Disabilities Act. Note that it says “NCEES encourages candidates with disabilities to request accommodations.” So they want you to speak up if you need something!
Next, you’ll see the Military section which is for those who need to take the exam in a location different than where they are going to apply to be licensed. I have a cousin who is in the military and he was living in Italy when it was time for him to take the PE, but he was getting licensed in Utah, so he had to use this section to take the test in Italy.
Last is the religious section. Here you can request accommodations if you observe the Sabbath day on the day the exam is offered. NCEES is moving all exams to computer-based though, so very soon nobody will have an issue with this. Still, I like that it’s an option!
Step 7: Purchase a Practice Exam (OPTIONAL)

This next screen is where they offer you a practice exam for your discipline. You don’t have to purchase it, but I highly recommend you do. This is coming from the actual people who write the test questions and it’s super helpful.
And, if I remember correctly and it hasn’t changed, they actually use old exam questions! These practice tests are the best way to see how ready you are for the test.
I got the NCEES practice exam for my discipline but didn’t take it first thing when studying. I saved it and took other practice exams to get good, and then took it a few weeks before the actual exam. That way I had time to review what I still needed to work on and practice before test day!
Step 8: Review Your Information for Accuracy

This screen is pretty simple, you just want to look at the information and check that you’ve got the right exam, board, and accommodations.
It also has an option to add another exam, but I honestly can’t think of a reason why you’d want to do that. Maybe I’m crazy, but one 8-hour, 80-question licensing exam is enough for me!
Step 9: Review Your Address, Cart, Financial Policies, and Check Out
Next you’ll review your billing address and once you select it, you’ll see this page:
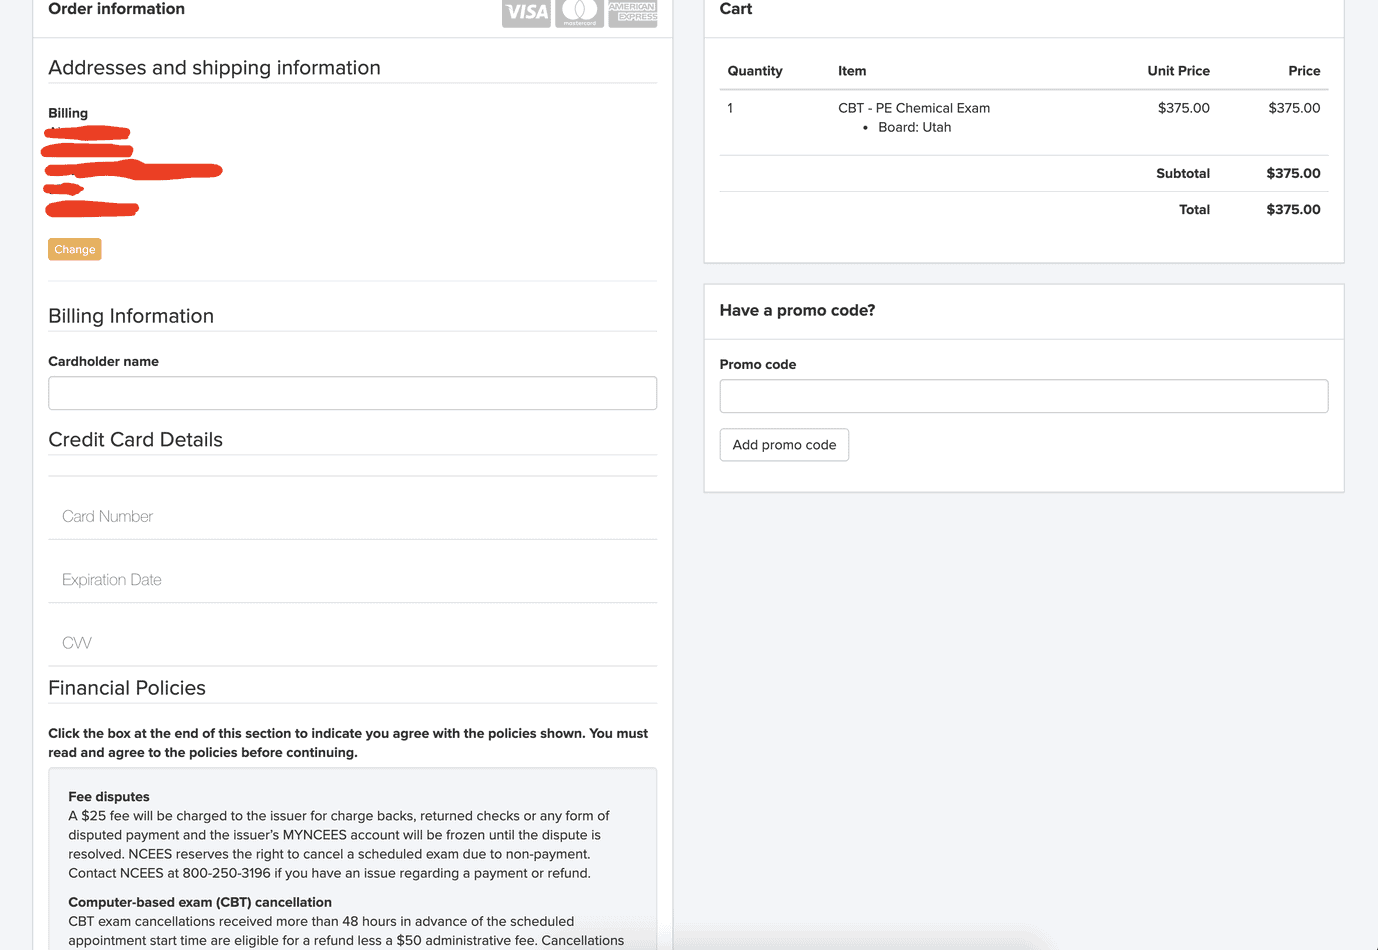
There’s a lot here but it’s really just a simple checkout page. I’ll still break it down piece by piece for you so that there’s no confusion when it’s your turn to register.
We’ll start with the simpler right side then talk about what’s on the left.
On the top right you have your Cart which just shows the exam you’re registering for and the cost. The current cost of most PE exams is $375.
Then you have a space for a promo code below that. There’s a Chrome extension called Honey that will automatically check for codes for you. Just try that if you want, but you don’t have to. As far as I’m aware, there are no promo codes for the exams themselves.
Now for the left side you have your Order Information at the top, including your billing address and credit card information.
Next are the Financial Policies. Most of them apply to computer-based tests only, which are important to know about if you plan to take the PE in 2022 because that’s when it will be all computer-based. Here are some details to note about each policy:
- Fee disputes – this is just your typical “if your check bounces or there’s not enough money in your account then you’ll be fined” thing. Be aware that this can make your NCEES account frozen and possibly result in them canceling your exam.
- Computer-based exam (CBT) cancellation – You can cancel your test up to 48 hours in advance if it’s computer-based and be refunded everything except $50 for administrative fees.
So, for example, if your computer-based test is at 8 am on April 5, you can cancel it for a partial refund anytime before April 3 at 8 am. Anytime after that and you don’t get a refund. - Forfeiture of CBT exam registration fees – this just repeats the information above to reiterate that you don’t get your money back if you cancel within that 48-hour window or if you don’t show up.
- Rescheduling fee – This only applies to CBT tests as well and is just to let you know that you may be able to avoid higher fees if you reschedule less than 48 hours in advance.
- 12-month authorization period information – This only applies to those in a state that requires you to get an authorization to take the PE exam. It’s just saying that if you don’t take the test in that time you won’t get your money back.
Once you’ve entered your payment information, agreed to these financial policies, and hit “Complete order” at the bottom, you’ll be all registered for the PE!
And That’s How to Register For The PE Exam!
Registering for the PE Exam isn’t too difficult. These steps are, for the most part, pretty self-explanatory. But I remember how the details of each step confused me a little bit when I did it, so I wanted to create something that would help you understand them so you can get all signed up to take the test without any problems!
